A man, after looking and looking and looking, said to anybody and everybody, "I can't find the invisible thread!"
I couldn't help myself; I burst out laughing. (Then I showed him where it was.)
Yours? Any fabric store funny moments?
Blessings and peace...
Monday, October 22, 2012
Sunday, October 21, 2012
From a Jumper (UK Pinafore?) to a Skirt
This is my first sewing tutorial. Please let me know what you think (be gentle!) and especially if you find it useful.
Because evidently blogging about garment sewing adventures means suspending all pride in order to help readers understand what you are doing and why... here's a photo of me in the jumper. We'll call this BEFORE.
 Some time ago, I bought this jumper from QVC -- I liked the pintucks in the hem area and totally forgot that all of the models are about 6 feet tall and I am not -- and when tried it on at home, of course it was several inches too long. I could have just shortened it, but then I would have lost the one feature about it that I liked: the hem treatment!

So I put it in the closet. I recently decided to transform this into an elastic-waist skirt that retains the original hemline. I am using the finished curved neckline as the opening part of pockets that I am adding to the skirt.
An even hemline is one that is the same distance from the floor all the way around, when wearing the shoes that will be worn with that garment. Hemlines on skirts or dresses on some women are uneven. Here are a few reasons:
A yardstick and a thick rubber band
Elastic (1-inch wide) that I sewed into a loop so that it is snug around my waist (a piece of elastic a few inches shorter than your waistline and a safety pin to hold it in place would work just as well)
Shoes that I would wear with the skirt
A mirror that's either long enough or angled enough that you can view your waist down to the floor
A sliver of soap for marking the fabric
Usual sewing supplies (machine, thread, etc., and 3/4-inch wide elastic)
Note: See photos at end of lists.
At this point, you have a couple of options:
And we'll call this AFTER. Here I am, wearing the skirt. Getting used to using the timer on the camera. Jumping on and off the platform. No mirror; no time to fix my sweater, posture, etc...
 So, in my next jumper-to-skirt project (because yes, indeed, I bought two of these!), I will bring the side seams in even more, and I might eliminate the slits.
I have a couple of questions for you, if you don't mind:
Do you like the photos centered? Left-aligned? Some other way?
Special thanks to Bunny who suggested PhotoScape as a good photo editing software.
I need a nap!
Blessings and peace...
Because evidently blogging about garment sewing adventures means suspending all pride in order to help readers understand what you are doing and why... here's a photo of me in the jumper. We'll call this BEFORE.


So I put it in the closet. I recently decided to transform this into an elastic-waist skirt that retains the original hemline. I am using the finished curved neckline as the opening part of pockets that I am adding to the skirt.
An even hemline is one that is the same distance from the floor all the way around, when wearing the shoes that will be worn with that garment. Hemlines on skirts or dresses on some women are uneven. Here are a few reasons:
- I might have more or less (ahem) "soft tissue" in certain areas (tummy, high hip, bottom) than the designer or pattern maker allowed for.
- My waist might be tilted; that is, it might be lower in the front than in the back or it might be higher in front than in the back. Or one side and the other.
- My posture might be different from the ideal, and it could be different front to back and/or side to side.
For this remake, I used the following:
A skirt that is too long (a jumper, actually)A yardstick and a thick rubber band
Elastic (1-inch wide) that I sewed into a loop so that it is snug around my waist (a piece of elastic a few inches shorter than your waistline and a safety pin to hold it in place would work just as well)
Shoes that I would wear with the skirt
A mirror that's either long enough or angled enough that you can view your waist down to the floor
A sliver of soap for marking the fabric
Usual sewing supplies (machine, thread, etc., and 3/4-inch wide elastic)
Note: See photos at end of lists.
Part 1: Establish the actual waistline:
- Decide on the finished length from the floor, wearing the appropriate shoes and the too-long skirt. Pull the elastic loop on over the skirt (or length of elastic around your waist and pin it so that it's snug). Fiddle with the elastic until it is at your own waistline all the way around.
- Distribute the skirt fabric evenly around, paying careful attention to making sure that the skirt's side seams are at your side seams.
- Pull the skirt fabric up and down above the elastic until you find the length that works for you. Mine is 14 inches from the floor.
- Wrap the thick rubber band snugly around the ruler, placing the bottom of the rubber band even with your finished length.
- Place the ruler in front of you, with it touching both the floor and the skirt fabric, so that the rubber band mark is at your desired length from the floor.
- Pull the fabric up and down above the elastic, keeping the side seams straight, until the skirt is even all the way around. Photo shows bunched up fabric above elastic.
- With your sliver of soap (or other preferred marker; I like to use white slivers of soap because they come right out with steam from my iron), mark the bottom of the elastic all around. Don't worry if you miss a few spots because of fabric folds.
- Remove the elastic and the skirt. With the soap sliver, connect any missing portions and even out any irregularities. Do not expect a line that is parallel to the hemline.
 |
| Ruler with thick rubber band marker |
 |
| Determining my waistline for this skirt; see that bunched-up fabric over on the right just above the elastic? |
 |
| Arrows point to unevenness in front. Upper soap lines are explained in Part 2. |
 |
| Back is almost even... |
 |
| Unevenness shows more when looking at it from the side (front is at the right). |
- You can add a zipper and darts to the skirt and make a separate waistband and attach it.
- You can make a casing and insert the elastic through it. This is what I am doing with this skirt.
Part 2: Prepare to finish the skirt top:
- Select the elastic for your skirt. I suggest 3/4-inch to 1-1/2 inch wide elastic. The more uneven your waist, the better to use a narrower elastic. I am using 3/4-inch wide non-roll elastic.
- Add a few inches to the top of the marked waist for the casing, which must be enough to go around the elastic twice plus a bit extra. Caution: Math ahead! (but only a little)
Width of elastic x 2 + thickness of elastic x 2 + extra for finishing the raw edge and also to enable you to work the elastic through the casing. Mine:
a. Width of elastic: 3/4 inch x 2 = 1-1/2 inches
b. Thickness of elastic: 1/16 inch x 2 = 1/8 inch
c. Extra for finishing raw edge = 1/4 inch
d. Ease in working elastic through casing = 1/4 inch
e. Total: 2-1/8 inches, rounded up to nearest 1/4 inch = 2-1/4 inches - Mark the skirt 2-1/4 inches (or YOUR calculation result) above the marked waist, and cut all around.
Part 3: Adjustments before finishing the waist:
- Try the skirt on again, with the elastic loop over it. In addition to making a few minor adjustments in length, I decided that my skirt was too full, so I resewed the side seams.
- I made two patch pockets, using the finished neckline curve for the slip-your-hands-in portion. I planned to sew one raw edge into the side seam. Unfortunately, I forgot that I reshaped the side seams so that they were no longer straight. I set the pockets aside while I continued with the skirt.
- The slit at the bottom of the side seams, which was originally about 10 inches long, was too long after I shortened the skirt. So I reworked the side seams (again), especially the bottom portion of the side seams so that the new slits were a more proportional length, now ending at the top of the pintucks.
- Pockets: I turned under and pressed the raw edges of the pockets. Denim is thick. I took the pockets to the basement (concrete floor) and hammered the corners of the folded pockets to flatten them. I then topstitched each pocket close to the folded raw edges, then steam-pressed them to remove the rippled corners. I then pinned the pockets onto the skirt front parallel to each other and a bit in from the side seams. I stitched them on.
 |
| Arrows point to slip-your-hands-in portion of pockets |
 |
| Cut in half; center edges will become outside edges. |
 |
| Arrows point to slip-your-hands-in portion; outer edges are now at edges of photo. |
 |
| Raw edge folded under and pressed. |
 |
| When top edge is folded down, the thickness of denim becomes apparent. |
 |
| Smack, smack. |
 |
| Thinner, manageable. |
 |
| Topstitch close to the folded edges. |
 |
| Ripples (caused by bias)... |
 |
| ...taken care of with steam, heat, and pressure. |
 |
| Pockets pinned to skirt front |
 |
| Stitch pockets, again stitching close to the edge. |
Part 4: Finish the waist:
- Serge (or press under 1/4 inch) the top raw edge.
- Fold over the waist the width of the elastic plus 1/4 to 1/2 inch, and press.
- Stitch from the right side, close to the finished edge, leaving an opening approximately 4 inches long for the casing.
- Trim the corners of the elastic, attach a safety pin, and insert the elastic through the casing.
- Try the skirt on again. Adjust the elastic until it is comfortable. Pin the elastic. Adjust the skirt, making sure that the skirt's side seams are at your side seams. Place clips or pins at the side seams.
- Pull the elastic out at least a few inches. Trim the end and stitch the ends of the elastic together. Stitch the opening closed.
- To keep the elastic distributed as desired, stitch in the ditch at the side seams.
 |
| Serge the top raw edge. |
 |
| Serged top edge |
 |
| Fold over and press. Note the curve (because of my unevenness). |
 |
| Stitch from the right side. |
 |
| Elastic and pin. |
 |
| It doesn't matter (to me) that the thread color doesn't match the elastic color. |
 |
| Stitch in the ditch to keep elastic distributed as desired. |

I have a couple of questions for you, if you don't mind:
- Please give me some styling advice as to what kind of silhouette would be best for me to wear with this skirt. I traded in my actual waistline for menopause some time ago.
- What do you think of the length? This is the length that I feel most comfortable with, but I don't know whether it's the most flattering length. The camera is at eye level.
- I feel like this tutorial is really really really long, but I am at a loss as to what to omit. Suggestions welcome. Criticisms welcome, too, as long as they are sandwiched in kindness.
Do you like the photos centered? Left-aligned? Some other way?
Special thanks to Bunny who suggested PhotoScape as a good photo editing software.
I need a nap!
Blessings and peace...
Thursday, October 18, 2012
Help for One Who Is Suffering
Today my sister would have been 64 years old, if she had not taken her life a few years ago.
If you are suffering deeply and seemingly endlessly, or know someone who is, please feel free to share this post with them.
"When you feel you can't go on, call a Suicide Hotline 1-800-784-2433 or 1-800-273-8255." Crisis counselors are waiting for your call. How could it possibly help? Call to find out. Or click here for more resources.
Your life is precious and valuable, no matter how it might feel at the moment. Please and thank you.
Blessings and peace...
Tuesday, October 16, 2012
Eight Stitches But Not of the Knitting Type
We just got home a little while ago. I was being careless and inattentive when chopping Swiss chard and cut my right index finger. Oops. I initially thought that I could manage it with a bandaid and compression, but it quickly became clear that I needed help. So we went to Immediate Care on Transit Road, and they took excellent care of me.
So much to be grateful for: excellent care, help close by, highly skilled professionals, top-notch tools and materials, and an entirely smooth process.
I am nearing the completion of a sewing project that I have been writing a tutorial for, and thought I'd be finished today. Soon, friends, soon.
Blessings and peace...
Wednesday, October 10, 2012
Knitting: Blocking Matters
...even for such simple knitted things as dishcloths. Here's what I mean (pardon the off coloring in my photos):
Before blocking:
 Being blocked:
 After blocking:

Again, before blocking:
 During blocking:
 After blocking:

Blocking allows you to shape the finished item, and it makes the pattern more visible.
Notes: After I've finished knitting something, I always hand wash it. (It might be for someone with allergies, and we have a cat.) I rinse, rinse, rinse, then squeeze out as much water as I can, then roll it in a towel. Then I block it by placing it on a foam square, adding pins every inch or so, shaping it as I go. For something larger, such as a scarf or shawl, I might use blocking wires. I'll show you some of those photos another day.
Blessings and peace...
Before blocking:


Again, before blocking:


Blocking allows you to shape the finished item, and it makes the pattern more visible.
Notes: After I've finished knitting something, I always hand wash it. (It might be for someone with allergies, and we have a cat.) I rinse, rinse, rinse, then squeeze out as much water as I can, then roll it in a towel. Then I block it by placing it on a foam square, adding pins every inch or so, shaping it as I go. For something larger, such as a scarf or shawl, I might use blocking wires. I'll show you some of those photos another day.
Blessings and peace...
Windowpanes Knitted Dishcloth Pattern
I am honored to share (by request!) my own pattern that I used for some of the dishcloths shown in my October 2 post.
And here are a few of the tips and techniques I incorporate into my knitting:
1. I usually use a needle one size larger for the cast on and a needle two sizes larger for the bind off. For example, I use a size 6 (4 mm) needle for worsted weight cotton for dishcloths, so I use size 7 (4.5 mm) for the cast on and size 8 (5 mm) for the bind off. This helps to achieve the same stretch in the cast-on and bind-off edges as for the body of the piece.
2. Speaking of needles, I use circular needles for both round and flat work. It makes knitting in close quarters (such as a movie theater) much easier. And if I happen to drop one end of the circular needle, I am still holding the other end, so I don't really lose the needle.
3. When I set my work down or put it away for a while, I push all of the stitches to the cable section (thinner section of the needle between the two ends), ensuring that a ridge from having left the stitches on the thickest part of the needle won't permanently form in that row.
4. When I use the long-tail cast on, my choice for dishcloths, I work the first 3 to 5 stitches with both yarns, the yarn end and the ball yarn. That way, I don't need to weave those ends in later.
5. I try to complete a row before setting my work down, which helps to maintain a more even tension.
6. Blocking. I block almost everything I knit. It vastly improves the appearance, evening out changes in tension throughout the piece. I think it somehow presses the blocked shape into the memory; in other words, even after a cloth is machine washed and dried, it retains the blocked shape.
Windowpanes Dishcloth by Sandra Carden
Front:

Back:

Needles: Size 7 to cast on, 6 to work dishcloth and 8 to bind off. Gauge is not important.
Abbreviations:
st(s) = stitch(es)
k = knit
p = purl
For a smoother edge (optional): Slip the first stitch of each row as if to purl. If the next stitch is a knit stitch, remember to move your working yarn to the back first. If the next stitch is a purl stitch, your yarn is already in front, so you do not need to move it.
Side borders: Begin and end each row in seed st (5 sts).
Instructions for pattern between the side borders:
Work bottom border.
Row 1: K1, P4, K1, P4, K1, P4, K1, P4, K1, P4, K1.
Row 2: P1, K4, P1, K4, P1, K4, P1, K4, P1, K4, P1.
Row 3: K1, P4, K1, P4, K1, P4, K1, P4, K1, P4, K1.
Row 4: P1, K4, P1, K4, P1, K4, P1, K4, P1, K4, P1.
Row 5: Knit across.
Row 6: P1, K4, P1, K4, P1, K4, P1, K4, P1, K4, P1.
Repeat these six rows six times.
Work top border. Bind off using size 8 needle in knit stitch. Weave in yarn ends. Block.
~ ~ ~ ~ ~ ~ ~ ~ ~ ~ ~ ~ ~ ~ ~ ~ ~ ~ ~ ~ ~ ~ ~ ~ ~ ~ ~
Shorthand: Repeat between * and *.
Work bottom border.
Row 1: K1, *P4, K1* across.
Row 2: P1, *K4, P1* across.
Row 3: K1, *P4, K1* across.
Row 4: P1, *K4, P1* across.
Row 5: Knit across.
Row 6: P1, *K4, P1* across.
Repeat these six rows six times.
Work top border. Bind off in knit stitch. Weave in yarn ends. Block.
Resource:
Knitting Help has free knitting videos.
I have taken some before, during, and after photos of the blocking part of knitting, so I will write about that soon.
And I have started a sewing project, a reworking of something I bought but will never wear, so that's on my list of sewing projects to share with you.
Blessings and peace...
And here are a few of the tips and techniques I incorporate into my knitting:
1. I usually use a needle one size larger for the cast on and a needle two sizes larger for the bind off. For example, I use a size 6 (4 mm) needle for worsted weight cotton for dishcloths, so I use size 7 (4.5 mm) for the cast on and size 8 (5 mm) for the bind off. This helps to achieve the same stretch in the cast-on and bind-off edges as for the body of the piece.
2. Speaking of needles, I use circular needles for both round and flat work. It makes knitting in close quarters (such as a movie theater) much easier. And if I happen to drop one end of the circular needle, I am still holding the other end, so I don't really lose the needle.
3. When I set my work down or put it away for a while, I push all of the stitches to the cable section (thinner section of the needle between the two ends), ensuring that a ridge from having left the stitches on the thickest part of the needle won't permanently form in that row.
4. When I use the long-tail cast on, my choice for dishcloths, I work the first 3 to 5 stitches with both yarns, the yarn end and the ball yarn. That way, I don't need to weave those ends in later.
5. I try to complete a row before setting my work down, which helps to maintain a more even tension.
6. Blocking. I block almost everything I knit. It vastly improves the appearance, evening out changes in tension throughout the piece. I think it somehow presses the blocked shape into the memory; in other words, even after a cloth is machine washed and dried, it retains the blocked shape.
Windowpanes Dishcloth by Sandra Carden
Front:

Back:

Materials and Notes:
Yarn: Cotton worsted-weight variegated yarn: One 2 to 2.5 oz ball will usually make two cloths.Needles: Size 7 to cast on, 6 to work dishcloth and 8 to bind off. Gauge is not important.
Abbreviations:
st(s) = stitch(es)
k = knit
p = purl
For a smoother edge (optional): Slip the first stitch of each row as if to purl. If the next stitch is a knit stitch, remember to move your working yarn to the back first. If the next stitch is a purl stitch, your yarn is already in front, so you do not need to move it.
Cast on 36 sts using size 7 needle.
Bottom border: Change to size 6 needle and work in seed st (*K1, P1*, repeat, ending K1) for 6 rows.Side borders: Begin and end each row in seed st (5 sts).
Instructions for pattern between the side borders:
Work bottom border.
Row 1: K1, P4, K1, P4, K1, P4, K1, P4, K1, P4, K1.
Row 2: P1, K4, P1, K4, P1, K4, P1, K4, P1, K4, P1.
Row 3: K1, P4, K1, P4, K1, P4, K1, P4, K1, P4, K1.
Row 4: P1, K4, P1, K4, P1, K4, P1, K4, P1, K4, P1.
Row 5: Knit across.
Row 6: P1, K4, P1, K4, P1, K4, P1, K4, P1, K4, P1.
Repeat these six rows six times.
Work top border. Bind off using size 8 needle in knit stitch. Weave in yarn ends. Block.
~ ~ ~ ~ ~ ~ ~ ~ ~ ~ ~ ~ ~ ~ ~ ~ ~ ~ ~ ~ ~ ~ ~ ~ ~ ~ ~
Shorthand: Repeat between * and *.
Work bottom border.
Row 1: K1, *P4, K1* across.
Row 2: P1, *K4, P1* across.
Row 3: K1, *P4, K1* across.
Row 4: P1, *K4, P1* across.
Row 5: Knit across.
Row 6: P1, *K4, P1* across.
Repeat these six rows six times.
Work top border. Bind off in knit stitch. Weave in yarn ends. Block.
Resource:
Knitting Help has free knitting videos.
I have taken some before, during, and after photos of the blocking part of knitting, so I will write about that soon.
And I have started a sewing project, a reworking of something I bought but will never wear, so that's on my list of sewing projects to share with you.
Blessings and peace...
Saturday, October 6, 2012
Need an Apron for Yourself or As a Gift? (Sale!)
I just saw that this sewing-theme apron is on sale again ($6.99, regularly $34.99) from Nancy's Notions.
Sewing-theme apron
I bought one a month ago and can attest to the quality of fabric used and the workmanship. Of course it could be (and, here, has been) worn more than for sewing.
I am posting this because I love aprons. So much so that I am planning a blog post about aprons. And so much so that I tried every which way to include "apron" in my blog name.
Do you love aprons? What do you like about them?
Blessings and peace...
Thursday, October 4, 2012
Jimmy Burgess's Mother
So, I've been thinking about the knitting part of my life and thought I'd share a bit about it with you. When I was 10 years old, Jimmy Burgess (who was maybe 5 years old at the time) and his parents lived on the other side of the duplex (two family house, side by side) that our family owned. Mr. and Mrs. Burgess were from Scotland, and you had to really want to understand what they were saying -- their accents were that thick. Sometimes I spent time with Mrs. Burgess and Jimmy after school while Mr. Burgess was at work.
Mrs. Burgess was a knitter, and she taught me the knit stitch (not how to purl or cast on or bind off or increase or decrease or fix mistakes, just the knit stitch). She probably would have taught me all of those and then some, but we moved. I took my needles and ball of yarn with me but don't remember ever seeing them again.
I resumed knitting with Elizabeth Zimmermann during her PBS TV series when I was pregnant with my daughter, and I made many baby items for my daughter and then for my son. Once again, I didn't intentionally set it aside; it's not that I lost interest so much as my life filled up with other activities.You might have read about that phenomenon. Pretend there's a smile or wink emoticon here. ;)
Fast forward a few decades, and a friend I met online, Fran, sent me a photo of a little triangle neck scarf she had knitted. That was all I needed to see. Quick, easy, fun project with a cute result.
So my life in knitting resumed. Oh yes, I used those eyelash yarns, ladder yarns, even glow-in-the dark yarns to make little scarves for myself and everybody around me. Fun fun fun!
I tried fitted sweaters (cardigans and pullovers) but the results were not wearable. I might get back to that type of project some day. For the past few years, though, my knitting has consisted of cotton dishcloths, most of which I've sold and donated the proceeds to St. Gianna Molla Pregnancy Outreach Center, a local pro-life ministry; gifts for new babies, family, and friends; and recently a scarf for myself.
Here are a few things I've knitted:
 Dishcloths
 Smaller dish cloths
And then some baby hats:
 Trio of baby boy hats
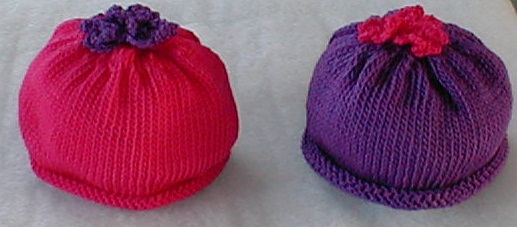
 Hats for twin girls
 And an Easter basket of hats for preemie babies at Sisters of Charity Hospital (my Lenten knitting that year).
I'll show you more in the coming days. In the meantime, if you know Jimmy Burgess who lived on Fowler Avenue in Kenmore, NY, in the 1950s, let me know -- I'd love to reconnect with him and tell him about the difference that his mother made in my life.
Blessings and peace...
Mrs. Burgess was a knitter, and she taught me the knit stitch (not how to purl or cast on or bind off or increase or decrease or fix mistakes, just the knit stitch). She probably would have taught me all of those and then some, but we moved. I took my needles and ball of yarn with me but don't remember ever seeing them again.
I resumed knitting with Elizabeth Zimmermann during her PBS TV series when I was pregnant with my daughter, and I made many baby items for my daughter and then for my son. Once again, I didn't intentionally set it aside; it's not that I lost interest so much as my life filled up with other activities.You might have read about that phenomenon. Pretend there's a smile or wink emoticon here. ;)
Fast forward a few decades, and a friend I met online, Fran, sent me a photo of a little triangle neck scarf she had knitted. That was all I needed to see. Quick, easy, fun project with a cute result.
So my life in knitting resumed. Oh yes, I used those eyelash yarns, ladder yarns, even glow-in-the dark yarns to make little scarves for myself and everybody around me. Fun fun fun!
I tried fitted sweaters (cardigans and pullovers) but the results were not wearable. I might get back to that type of project some day. For the past few years, though, my knitting has consisted of cotton dishcloths, most of which I've sold and donated the proceeds to St. Gianna Molla Pregnancy Outreach Center, a local pro-life ministry; gifts for new babies, family, and friends; and recently a scarf for myself.
Here are a few things I've knitted:


And then some baby hats:


I'll show you more in the coming days. In the meantime, if you know Jimmy Burgess who lived on Fowler Avenue in Kenmore, NY, in the 1950s, let me know -- I'd love to reconnect with him and tell him about the difference that his mother made in my life.
Blessings and peace...
Tuesday, October 2, 2012
Is There Room for One More at This Party?
After telling people for the last oh-so-many years, "I'm an editor, not a writer," and declining any and every project that involved writing, here I am thinking for a brief moment that I have any business starting a blog. I do have a few topics I want to share with you, my dear reader(s), so we'll see whether this blogging thing is as simple as people tell me.
And simple this blog will be. Easy sewing projects. Easy knitting projects. Easy food ideas.
I hope to write about my own projects and to share resources that help me to add beauty and goodness to our world. Because I am never "making it" without help, whether it's another blog, a YouTube video, books, family, friends, and faith.
My first blog post was going to be about yesterday's Autumn Craft Day (fallen leaves dipped in melted beeswax) that we did with several young children, but I forgot to take pictures. So I'm hoping to have another Autumn Craft Day; after all, I still have the beeswax in the slow cooker.
And sometimes "making it" is about getting through a situation, circumstance, or season; we might explore that, too.
Blessings and peace...
Subscribe to:
Posts (Atom)