Saturday, October 5, 2013

Giveaway Results and Update on Autumn Leaves Fabric

Good morning! Here's the result (of using random.org, which generates random numbers from the range you submit) for my orange print fat quarter fabric giveaway contest. I disregarded all the even numbers (my comments) and Joy, who requested to not be entered. Here are the winners:
Betsy B, I hope you will make this little project. If you do, will you please let me know? And maybe send me a photo or two of the process and/or result? Actually, I'd like it if you would videotape it and put the video up on YouTube; it would be an instant hit, I am sure!


Quilting Tangent, who liked two of the fabrics in particular. I'll do my best to select one of those for you, QT.


Angie, I am positive that your crafty 11 year old could do this -- and with some help from younger ones, too.


Emily, you have some (not quite so little) little helpers that you can include in this project.

Congratulations! I hope you will use the free tutorial to make this easy project. If you do, will you please let me know? And maybe send me a photo or two of the process and/or result?

Thanks; this was fun! And even if you didn't win a fat quarter, you can still use the free tutorial to make one (or more) of these pumpkins.

Update about my autumn leaves fabrics
I completed another table mat. It's for a friend who has a birthday next month, and her table is quite a bit larger than mine. I had that in mind when I made this one.

And I'm now making a reversible apron with these remaining pieces (and adding in some leftover linen fabric from another sewing project):

What are you sewing this weekend?

Blessings and peace...

Sunday, September 29, 2013

Fabric Pumpkins: Easy No-Sew Craft Project and a Giveaway

A couple of years ago, I hosted a little Craft Day for a friend, her two daughters, and their four little children. I'm not really used to doing this; most of my sewing are solo projects. However, when I saw this tutorial over at the Sew Thankful blog, I just had to invite them over so we could make these together! I knew it would be fun. (I was right.) The one I made is shown in this photo from my most recent sewing project: It's the pumpkin on the table runner. 

The small pumpkin (the size I made) uses a fat quarter of fabric, and the large pumpkin uses 1 yard of fabric. 

Here I am demonstrating  the fabric-tucking technique.

Two cute little girls selecting "leaves" from my collection of fabric swatches.

That was easy!

And, exhausting!

Photos used with permission, of course.

Giveaway: Would you like to make one of the small pumpkins but don't have any suitable orange (or green or purple) fabric? Let me know in the comments by Thursday, October 3; I'll select a couple of names and send a fat quarter to each person selected. You see that I have more than enough! Or just leave a comment, even if you have fabric and/or if you aren't going to make one of these. My feelings won't be hurt, I promise! :) 'cuz you know how we bloggers love comments!

Blessings and peace...

Tuesday, September 24, 2013

Progress Report About Those Quilting Fabrics

I am happy to report that I have used the majority of the quilting fabrics that I blogged about here. And I used at least a yard of another quilting fabric as well as a yard of flannel, which I used instead of batting. For tabletop things such as placemats and table runners, I prefer a thinner, flatter finish rather than a puffy, quilt-like finish, so I use flannel fabric instead of batting. Oh, plus I came across a few (?) yards of flannel before I looked for batting.

So far I've made one short table runner and four placemats. Here are a couple of photos:
Four placemats

 
Two placemats and a table runner
And here is how we usually use placemats: on top of a tablecloth. (It's easier to launder placemats than tablecloths, plus as the weather cools, the tablecloth adds a bit of warmth.)
All ready for today
I'm including a few construction details for you and also to help me remember for next time.
Press and then pin the completed placemat top to flannel. Notice that the corner pins are parallel to the edge rather than at a 45 degree angle, which makes the stitching easier. Machine baste about 1/8 in. in from the edge of the placemat top.
Optional: Trim to remove flannel.
Press the pieced top, which has been basted to the flannel, to the backing fabric (brown), which is placed wrong side up. Trim. Then move the backing fabric to on top of the the pieced top and pin, marking (with two pins or a clip) the place to stop stitching, which will create the opening for turning.
From the back, you can see the 1/4 in. stitching all around, except for about 4 in. at the center of the bottom, which is the opening for turning. Clip the corners. Turn. Press. Machine quilt.
One placemat, completed. 
One table runner, completed.

I am planning to make another table runner, narrower so that it can be used with four placemats. And it looks like I will make some coasters. And maybe some trim and pockets for an apron.

I welcome any other ideas. I'm really glad I decided to use this fabric now rather than know that it will be next fall before I am motivated to use it again. It's so autumnal! 

Blessings and peace...

Friday, September 20, 2013

Must Use These Quilting Fabrics

In organizing my fabricssomething I've been wanting to do for a few months years—I came across these coordinated cotton fabrics that I bought at a very nice little quilt shop. 
1/2 yard panel
1 yard striped print (a little more than half is shown)
Top left: panel. Bottom left: striped print. Right: 1 yard each gold and green "mottled" solid.

I am not a quilter, but once in a while I go to a quilt shop with a friend who is a quilter. Of course I want these independent shops to stay in business, and I did like the look of these fabrics, but here we are at least a year later, and I still haven't done anything with them. If I don't sew them up now, it will be at least another year before I look at them againbecause of the seasonal nature of the prints.

I found a free project sheet at Fabric Depot; here's the cover:
Project sheet
As you can see from the project sheet, I don't have all the fabrics in the collection (whew!).  The project sheet is 9 pages and includes instructions for making everything you see here.

I plan to make a reversible table runner and a small (approximately 12-in. square) table topper. But I don't need any more placemats. 

Do you have any ideas or suggestions or links to easyremember easy, please—for using up this fabric? I'd like to make some gifts that people would really like and use. Maybe a set of coasters from the smaller print? Maybe an easy apron? Any other ideas?

Bonus points / extra credit for any ideas that use these fabrics in something I could wear without looking like I'm wearing a quilt.

I'm making myself use this fabric to burn it into my brain to stop buying fabrics for quilting projects! Maybe it's not my responsibility to keep quilt shops in business.

Thanks for any and all suggestions. I will post updates. Achi dachi!

Blessings and peace...

Thursday, September 19, 2013

Sewing Contest You Can Vote On

Oh me oh my. There's another sewing contest, and everybody can vote. It's sponsored by Fabric Mart, a great online fabric shop. You can read all about the contest here. The contest started with ten contestants, and now there are nine. Too bad I didn't post this a few days ago, or you would have been able to vote for one of the entries in the first challenge: 

"The theme for this week's challenge was using recycled materials to create a look. We let the door wide open on this challenge to see what our designers could really do! We told them they could use materials that would otherwise be thrown away, such as scraps from their sewing room. Or reinvent old pieces of clothing to create a new fashion forward look."

Kathy, who won the first challenge, made a cute peachy-salmon color party dress from her wedding gown! One contestant was eliminated, so now there are nine. Stay tuned for the next challenge. I know I will. 

I really want to tell you who I voted for. But instead, go take a look at all ten entries for the first challenge, read their stories, and let me know what you think. 

Blessings and peace...

Wednesday, September 11, 2013

Fellow Blogger Gentleman Jim Tailor Extraordinaire

This is just a quick note to introduce you to a fairly new blogger. New to blogging, but not new to fine sewing and tailoring and patternmaking. Go right on over to Fine Tailoring by Jim and read all about this wonderful now-southern gentleman. He is posting great tutorials, and it's obvious that he is a master at his craft. He is having a giveaway of his DVD set, Alterations. I think it ends pretty soon, so hop on over. I'm going to add him to my blog roll so that I don't miss a thing. 

Blessings and peace...

Wednesday, September 4, 2013

Giveaway Result and More Zippered Cases

Good morning! Here's the result of using random.org, which generates random numbers from the range you submit, for my little zippered case giveaway contest. 
My plan was that if I selected a number that represented Theresa, who requested to not be entered, or me, who replies to lots of comments, that I would repeat the process. However, that wasn't necessary. Congratulations to Martha, who said, "...storage of our younger granddaughters hair ornaments - pony tail holders, baretts and such!" Please contact me, Martha, and let me know which of the three little zippered cases you'd like.

I made three more from the road and cars fabric. I plan to make two or three more, from different fabric, then I'm going to move on to other projects.

Because the zipper pulls are small, I thread a strand of the cut-off part of the zipper through the tiny hole in the zipper pull, then tie it. Here's a close up of one:
Blessings and peace...

Tuesday, September 3, 2013

Will You Help Me Decide -- and a Reminder About My Giveaway

Update: Please read the update at the bottom of this post. Thanks!

Okay, so I really need to hear from you. I'm thinking of "unretiring" from my career as a technical editor so that I can edit sewing pattern instructions, and you can help me make my decision. Here's what I'd like to know:
  1. Do you buy downloadable sewing patterns (and instructions and tutorials, so I'll just use "patterns" in this post to mean all three) from individuals or small companies (rather than the "Big Four", and I'll add in Burda, too)?
  2. For what kind of projects do you buy patterns (garments, purses, upcycling, baby and children's clothing and accessories, home dec, other [please mention])?
  3. Do you print the patterns or read and use them from your computer? Ereader? Other mobile device? Or both print and use from computer/mobile device?
  4. Do you notice errors and omissions?
  5. Do you notice inconsistencies?
  6. Are you aware of confusing instructions and/or instructions that are out of order?
  7. Do you care?
  8. Why? In other words, how does this affect your 1) ability to use the pattern and 2) your pleasure and enjoyment of the pattern?
  9. If you notice these problems, how does it affect your decision about a subsequent pattern from that person or small company? (Are you more likely to buy it or less likely to buy it?)
  10. What bugs you about patterns?
  11. How would you like them to be different?
  12. Do you have different satisfaction standards for patterns that are free compared to those you purchase?
  13. What else would you like to say about this topic? 
I welcome your answers to any/all of these questions. Short and sweet or long and detailed: all are welcome. However, please do not mention specific individuals or companies by name or innuendo; I feel so strongly about this that I promise to delete your comment if you do. This post is not about bashing; it's honestly and only about helping me to make this decision.

A great big THANK YOU to everyone who reads this and replies. This time, it's you who's helping me! "We help each other!"

And a reminder: The giveaway for a little zippered case with a see-through front ends tonight (Tuesday, Sept 4) at 11:59 pm EDT. That post is here.

Update: I think I am asking way too many questions here. How about if you choose one or two questions and answer those. Would that be better?

Blessings and peace...

Sunday, September 1, 2013

Invitation to Be Generous: Pillowcases

My Internet sewing friend, Rhonda of Rhonda's Creative Life, has undertaken an enormous project: making 900 pillowcases for... I don't think she'll mind if I copy and paste from her most recent post:

The pillowcases are for the Mary Bridge Children's Hospital in Tacoma, Washington. Each child that is admitted to the hospital is given a special pillowcase. They find that a simple pillowcase helps to lift spirits and brings color into an all to white and scary environment. If you think that you might like to contribute to the project, here is a link to the simplified instructions I did to make the pillowcases. I believe in the motto of "there is strength in numbers," so if you feel that you can do just one pillowcase, it will be greatly appreciated.

Oh how I wish I knew how to indent a paragraph here. Anyway, I have made six so far and plan to make at least a few more. They are one of the easiest-peasiest sewing projects ever, thanks to Rhonda's great tutorial. Here are the first four I made:
My first four pillowcases, details follow, from left to right
Bumble bees and ladybugs
Seashells and triple zigzag stitching at edge of main fabric
Row of pink flowers stitched at edge of main fabric
Serpentine stitch (I think) at edge of main fabric
Inside view of the lower edge/side seam
What do you think? Can you make one (or maybe a few)? Each pillowcase takes only 3/4 yard of the main fabric plus smaller amounts for the accent and trim. Rhonda posted today that she now has 640 pillowcases! Only 240 to go (well, 230 after I send her the six I've completed and a few more).

In addition to the pillowcases she's making, Rhonda hangs the pillowcases she receives in the mail on a clothesline and takes photos for us. Thanks, Rhonda, for inviting us all to be generous. I'm just extending it a bit to any of my readers who haven't been following this lovely journey with you.

Blessings and peace...

Saturday, August 31, 2013

Pattern Mini-Review and a Giveaway

 This is the fifth one of these I've just made:
I saw this pattern a few times, and I had to have it. 
(The clickable link takes you to a page where you can order it. Because I don't know how to make a clickable link from an image. Anyone? Anyone?) It's possible that some of you could figure it out by looking at the pictures, but not me. I need instructions, and the more detailed, the better. And lots of close-up photos. So I ordered the pattern (the first time I've purchased a downloadable pattern) for this little zippered pouch made out of quilted fabric that has a clear vinyl front. The photos are so clear and helpful. And the instructions are quite good. I'm glad I purchased the pattern. Tracy, the designer, includes a lot of tips for sewing vinyl. I followed the instructions to a T. And I made one. Then another, and another. Then I got the idea of changing the size. My first attempt came out a little odd, but maybe in an endearing way.
See how the vinyl "wraps around" the bottom? That's what I mean. Endearing?

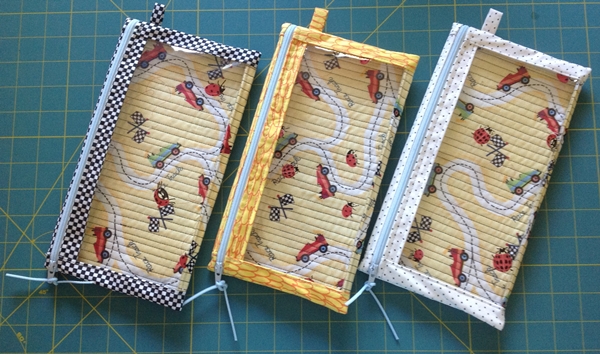
Then I wondered what would be the biggest size I could make with a fat quarter*. The photo at the top is one I made last night, and it's close.

And these were all made with one fabric each. Imagine how cute they'd be made up with multiple prints. Which I will get to. These are so much fun to make, and a pleasant break from garment sewing.

Okay, so let's have a giveaway. Would you like to win one of these? 
Post a comment by Tuesday, September 3 at 11:59 pm EDT. Try to give me some ideas about the size(s) that would be most useful to you and/or what you would use it/them for. I'll announce a winner (anywhere! Not limited to the United States!) by Thursday, September 5.

I've been using fabrics and zippers and vinyl that I have on hand. The vinyl has ladybugs in a random pattern all over it. I have no memory of what I thought I would make with it when I bought it (ahem) some time ago. And I'm not sure how much of it I have left. But now I'm going to use it all up on these. Unless you have some other ideas for easy sewing projects that use vinyl (with ladybugs sprinkled randomly all over it).

* A fat quarter is a term used in quilting. It means 1/4 yd of fabric, but instead of it being the full width of the fabric (usually 42 to 44 in. wide) and 9 in. long (1/4 of 36 in. [36 in. = 1 yd]), it's 1/2 the width and 1/2 the length. So a fat quarter is still 1/4 yd, but it's about 22 in. wide by 18 in. long.

Update: This next one (just completed) is off the top of the cuteness scale (in my opinion). Wouldn't it make a great case for a summertime first aid kit? The size, as you can probably tell, is about 9 in. wide by 5.5 in. high. I added a little loop to this one, too, so that a key ring (for example) can be added.
Front
Back
I made it from fabric left over from this purse project:

Blessings and peace...

Tuesday, August 13, 2013

The County Fair Chocolate-Covered Bacon

Louie and I went to the Erie County Fair yesterday, something we do every year. It's always fun; there's so much to see and learn and do. And eat.

Oh dear. Let's take a closer look...


Louie and I didn't treat ourselves with any of these. But we might have shared a "Fried Dough." It is the county fair, after all, and it's only once a year. ;) 

I've been sewing but not keeping up with photos. I will bring you up to date one of these days. Oh, and I'm planning a road trip to western Massachusetts and southeast Vermont later this week.

Have you been to your local county or state fair yet this year? What did you see, eat, learn, and do?

And I'll leave you with this photo from the fair.
Everybody Loves Louie
Blessings and peace...

Tuesday, August 6, 2013

Just Had a Little Blogging Moment

When I started my blog last fall, it was to give back a tiny measure of what people all over the world have given to me and to keep a record of my sewing and knitting projects as well as how I have improved my health. Then I started and learned a couple of things:
  • It takes a lot of work to create a tutorial.
  • I love love love to hear from my readers.
  • Comments from spamsters (which seldom appear here) are, for the most part, pretty funny.
  • People are so very kind and helpful.

So I was just clicking around, visiting a few blogs, and saw someone's request for guest bloggers who will post a tutorial for the "festive season" (code for Christmas, I think). I read a bit about it and thought, "Oh I have a couple of ideas; I think I could help!" And then I read the requirements, which included:

have a reasonable amount of traffic  - page views of 75,000 per month or more   
Since statistics have never been my thing, I have seldom looked at the stats for my blog. A couple of times I've looked and been so happy to see readers from several countries in addition to the United States. So I just looked, and golly gee, I've had 12,501 page views since I started, and of course, that includes the visits from the spamsters. I believe that this means that my blog has an unreasonable amount of traffic.
So I guess I won't be offering to submit a guest post. (BTW, I don't feel bad in any way. I'm just sharing this emotion-neutral experience.) Interesting, eh? 

If you have a blog, do you care about the numbers? What do they mean to you? (Maybe I should care?)

Blessings and peace...

Monday, August 5, 2013

I Saw the Buttons-Theme Rug and Fabric

When we were in Pittsburgh last week, I saw the buttons-theme rug and fabric at IKEA that Ruthie blogged about here
Size: 6' 5" x 4' 4" (195 x 133 cm). From the IKEA website: "The dense, thick pile dampens sound and provides a soft surface to walk on."

I didn't buy it because of the dense, thick pile (and maybe also because of the size). And it's too heavy to hang on the wall. However, if I can figure a way to rearrange my sewing room to place it away from where I scoot around on my chair-on-wheels, I'll go back and get it. Maybe I have a little space for a comfy chair and lamp; I would love that!

I also found the buttons fabric:
It's 59" wide and only $5.99 per yard. The particular bolt of fabric I saw, unfortunately, had smudge marks every 10 to 15 inches, darn it, because it is also so cute.

Between the two, I liked the rug better; it was just somehow more pleasing to the eye. One or both of these may find their way to my house one of these days. It's a week later and I'm still thinking about them!  

If you are near an IKEA store, take a look and let me know what you think. I don't think they are available to purchase from the website. Oh, and thanks, Ruthie!

Blessings and peace..

Thursday, August 1, 2013

Decluttering Skills Fail - Added an Embroidery Machine

Before dearly treasured family members came for a visit this weekend, which was followed by an overnight trip to Pittsburgh, Pennsylvania, to see a Pirates (baseball) game, ... I bought an embroidery machine! It's a Brother PE770 embroidery-only machine. I'm really excited about this new addition to my sewing room, although I have to create some space so that I can get it set up.

Evidently I am going to have to un-retire to pay for all the embroidery thread I will need. And software. And stabilizers. And spray adhesive. And designs.

Maybe I can make this pay for itself. Hahahahahahaha!

I welcome any and all tips, hints, suggestions, resources, and ideas of how to learn to use my new toy. Thanks!

{{Sorry, no photos; I'm on my iPad.}}

Blessings and peace...

Thursday, July 25, 2013

Cracking the Code of Joann's Pattern Sales

Hi friends,
This is just a quick note to make a statement:
I am never again going to miss the Vogue pattern sales at Joann's; I have done it for the last time. Once again, I missed the sale by just a couple of days (last week). And me with my list of the few Vogue patterns I wanted to—at the very leasttake a closer look at.

I don't know how I'm going to do it, I just know that I am going to do it.

Just because I have now made a second pair of pants with my Sure-Fit Designs pants blueprint (happy, happy me) and I am in the process of making a woven, short-sleeve top with my Sure-Fit Designs bodice blueprint (happy, happy me)—doesn't mean that I don't need want new patterns. They are still of interest for me: for the design details, for inspiration, for techniques.

Now, if you happen to know that someone else already has this figured out, please let me know. Because I don't need the satisfaction of putting this information together myself. I just need it! So if there's a link I could click at any day and time and see when the upcoming pattern sales are, that would most definitely work for me.

I have a feeling that there is a system to their pattern sales madness, and I am going to learn it, one way or another. And, of course, I'm going to share it here.

That is all, for now. 

Update: I went to Joann's for something else and as I passed the pattern cabinet, I saw a sign: Thursday to Saturday, July 25-27 Vogue Patterns $3.99. So now I'm looking at the current ad I received in the mail, and here's what I found:
Thursday to Saturday, July 18-20: Simplicity $1.99
Thursday to Saturday, July 25-27: Burda $2.49
{{nothing about Vogue patterns}}

Blessings and peace...

Sunday, July 7, 2013

My Version of a Sundress

Inspired by Rhonda, I purchased this fabric from Joann's. Rhonda shortened hers a bit and used some lovely ribbon for straps. I knew that the maxi-length wouldn't work for me; I know I would trip on a long dress, just going up the stairs. LOL Also, I wanted a little more coverage at the top, so I thought I could use the piece cut off from shortening the dress above the border to make a slightly fluttery almost-cap "sleeve." (What's that called?)
After serging the raw edges and preshrinking the fabric in the washing machine and dryer, I cut off the bottom border about 1 in. above the top of the border and set it aside. I then held the fabric up to myself and looked in the mirror, pinning it up, auditioning different lengths until I got it just about right (remembering that I would be reattaching the border). I cut about 12 or 14 in. from the new bottom.


Next, I trimmed the bottom edge, slightly curving the back up so that the center back would be about 1 in. shorter than the front—to allow for (ahem) front body contours, which take up more fabric than my (lack of) back body contours. Please note the level hemline. Thank you.

I reattached the border, using French seams to encase the raw edges, which also added a bit of desired weight to the dress bottom. I then trimmed the serged edges to straighten what would be the center back seam. I sewed this seam, again, using French seams to encase the raw edges

So then I had this nice piece of fabric to make the fluttery almost-cap sleeves. My first attempt was a failure; I don’t even remember what I was thinking. So, with not too much fabric left, I got out my Sure-Fit Designs bodice front and back blueprints. I aligned the front and back shoulder seams and from that, created a pattern piece as long and wide as I could, flaring it out at the center (the part that would go over my shoulder). I serged the outer and inner curved edges, pressed under and stitched to finish them.

Then I tried on the sundress, and by trial and error, pinned the sleeves to the bottom of the top ruffle in the front and back until I was happy with the angle and fit. It took me about 100 tries, okay maybe 50. At least 25. I then trimmed and serged the edges and stitched them, right side of the sleeve to wrong side of the sundress, stretching the elastic of the sundress at the same time. I then hand-stitched the top of the blue ruffle to the sleeves.

Sure-Fit Designs is as handy as a pocket, even when I’m not making an actual garment from it! Using the shoulder area of the blueprint helped me to see what shape I should cut to get the look I wanted.

I know we (seamstresses ~ sewers ~ sewists ~ stitchers ~ sewing artisans) like to see everything up close and personal, inside and out. Here's a closeup of the outside of the top, where the sleeve is attached to the ruffle.

And here it is from the inside. If you look really closely, you can see the stitched I used to tack the ruffle down (thread color deep blue same as ruffle).

Here's how the reattached bottom border looks. I slipped a piece of yellow paper under the seam.
Here's the center back French seam.

I am delighted with the result; I am especially pleased with the neckline. And that I kept at it, even after my first attempt at fluttery sleeves was a total fail? I attribute that to how much I like finishing projects! I wore this dress to a party and then a baseball game yesterday, and I think I will get a lot of use out of it.

Are you still making summer clothes (for this year)? Or, if you're "down under," for your upcoming summer?


Blessings and peace...