Showing posts with label Sew. Show all posts

Monday, February 23, 2015

Upholstery Samples Tote Bags

I love solving puzzles. I almost bought a piece of “fleece” at Joann’s last week; the pattern was all-over puzzle pieces. But I stopped myself thanks, in part, to the line at the cutting table. Jigsaw puzzles, crossword puzzles (as long as they’re easy), and sewing puzzles. I am putting this experiment into the last category. Sewing is very mathy, at least when you veer from the original pattern or instructions.

Remember my telling you about receiving some upholstery samples? Upholstery Samples.
I’ve made two tote bags and several smaller bags. Up first are the two tote bags.

Bag #1:
My first question about making a tote bag from these upholstery samples was, “What’s the largest size I can make the bag without piecing the front and back from smaller pieces?” I didn’t have high expectations for this one, so I decided to brush up on pocket-making skills in the hopes that the bag would be usable. The khaki canvas at the lower portion of front and back, as well as bottom, was added to the length of the bag.
And the answer is this:
The proportions are a bit odd, but that's okay.
The bag is 8.5 in. wide x 11 in. tall x 4 in. deep.
Here is my first attempt at gusseted pockets in the lining:
I followed the excellent tutorial at The Inspired Wren, except for my adaptations and experiments.

My construction challenge was what also appealed to me about the bag; that is, the sturdiness of the handles because of their being stitched into the bottom seam. The bulk of the bottom seam, which was at its thickest, was 12 layers of canvas fabric where the straps are seamed together. That gave my machine a workout.

Bag #2:
How can I make the bag a more proportional width without adding the clutter of more print pieces? I increased the width by adding canvas to the sides of the front and back pieces, as well as where the canvas already is.

Here's the result, again with the gusseted pockets in the lining:
The bag is 12 in. wide x 11 in. tall x 4 in. deep.
My second question was, "How can I reduce the bulk of the bottom seam, which was at its thickest, 12 layers of canvas fabric where the straps are seamed together?" The solution cane in two ways:
1. I decreased a bit of bulk by replacing the lower portion of the bag front canvas with quilting cotton (which would be covered by the bottom front panel). Result: 10 layers of canvas and 2 layers of quilting cotton.
2. I offset the straps by moving the front strap 1/2 in. toward the front, and the back strap 1/2 in. toward the back. Result: 6 layers of canvas plus 2 layers of quilting cotton. Aha! Significant reduction in bulk. Yea!

Here’s how it looks after the front handles and pocket are sewn onto the front and the back handles are pinned (well, Wonder Clipped and painter’s taped) onto the back, just before stitching the back handles down.
This view is (from top to bottom) (A) top of bag front with front pocket attached, (B) quilting cotton, and (C) front handles. (D) is the bag back laid out bottom to top.

And here’s a side view of that reduced bulk, accomplished by offsetting the straps.

And here are both bags:
Now that I have this figured out, I can go into production. Sort of. I'll keep adapting the bag, and it won't surprise me one bit if I add a zipper or two.  

Blessings and peace...

Monday, August 18, 2014

That Print Skirt

A friend took a few pictures of me wearing my new print skirt. If you're interested, you could compare the skirt on me to the skirt on a hanger. Because the fabric is so drapey, it doesn't look full at the hem (on me) like it does on the hanger. But it feels comfortable when I sit down, unlike a pencil skirt would (pencil skirt = leg hugger). Please let me know what you think about the length. The next skirt will be for fall.

Oh and I made the green shirt, from a Louise Cutting pattern (Perfect Blouse maybe?). I took it along for the weekend, even though it needed a good steaming or pressing, not having worn it in a couple of years. So it hangs kind of funny. I have my Laura Star (steam press) heating up right now.

Blessings and peace...

Tuesday, August 5, 2014

Yes I Did Finish My Skirt

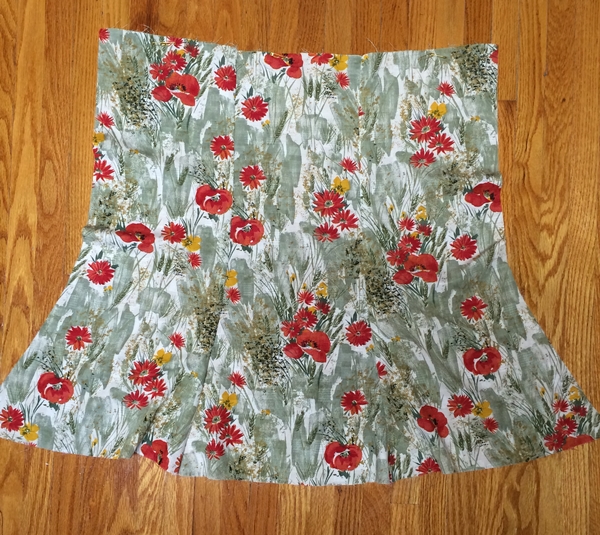
Here's a hanger shot of my skirt, completed this afternoon. My photographer is at a Broadway show right now and I wanted to publish this post.
The skirt hem is uneven on the hanger. On me, though, it's straight all around. :)

Yesterday, my husband, telling me his plan for tomorrow (today), "Wait. Why should I *pay* to go to the Central Park Zoo? New York City *is* a zoo!" He's having so much fun. It will be great to have him back home tomorrow.
 
Blessings and peace...

Monday, July 7, 2014

Sewing Is So Mathy and Mystery Solved

On June 30, I wrote:
Next up will be a 5- or 7-gored skirt. I tried to make one with inseam pockets, but it was not wearable because I didn't allow for the pulling (the pockets open) that would occur. That pulling emphasizes my tummy. Oh, no! I don't know quite how to overcome that, so this next skirt will be with or without pockets.

I increased the width of the panels of 7-gore skirt that I'm working on now by 1/4" per side = 1/2" per panel—because of my previous skirt attempt described above. That would result in a skirt that fits and has a bit of ease.

Before stitching the seams of this skirt, I referred to my notes and stitched 3/8" seams on 5 of the 7 seams, leaving 2 seams unsewn to allow for making inseam pockets before stitching those last 2 seams. So far, so good.

In preparation for the pockets, I read the pocket notes I could find, did a bit of online searching, created a pocket pattern piece, and was ready to sew the pockets. "Wow," I thought, "this is going great!"

Only because I'm very thorough, I decided to look at the too-small skirt, just to confirm my plan for the pockets. Well, how-dee-do. I stitched the seams of the too-small skirt with 1/2" seams INSTEAD OF THE 3/8" SEAMS called for in the pattern instructions.

Mystery solved. So that's why the skirt was too small. Think that 1/8 of an inch (the difference between the instructions and what I did) doesn't matter? Read on...

1/8" x 14 (the number of panel sides, 7 panels x 2 sides per panel) = 1.75".

So I sewed the skirt almost 2" narrower than I should have. There went the wearing ease.

For my current skirt, I had added 1/4" to each panel side:
1/4" x 14 (the number of panel sides, 7 panels x 2 sides per panel) = 3.5". This would give me plenty of ease. Actually a bit more than I needed, but I decided that I didn't want to fiddle with adding less than 1/4" per side (too much work).

So, when you correct the seam allowance error (1.75") + the newest skirt allowance (3.5"), the total is now 5.25". Of wearing ease. Too much. Which I confirmed by pinning the remaining seams and trying it on.

So now... my plan is to stitch these seams 7/8", which will reduce the overall width by 2". (I will then add the pockets, then trim the seam allowance.) In other words, the newest skirt will have 3.25" wearing ease. Which is very close to the wearing ease of the previous skirt—if I had sewn 3/8" seams instead of the 1/2" seams that I sewed. These 4 panels will be a bit narrower than the other 5, but I am currently striving for something that is wearable.

Anyway, see what I mean about failure?

On June 29, I wrote (near the end of the post):
Failure means I'm learning. Growing. Improving. Alive. Doing something. Living a life.

Lesson learned: Double, maybe triple check the instructions and previous versions of the same project.

I'll leave perfection for others. What's that saying? "Perfection is the enemy of the good." "Perfection is the enemy of done." "Perfection is the enemy of completing a garment sewing project that is wearable." <- My adaptation, which I just might have to print and frame in my sewing room!

Ha ha. Posting about my failures (instead of only the successes) is certainly giving me more to talk about!

Blessings and peace...

Saturday, July 5, 2014

Seven-Gore Flared Skirt Progress

I've been working a bit here and there on a seven-gore flared skirt. It's a pattern I've used several times, changing the number of gores, how flared it is at the bottom, and the length. Here's the front three panels, stitched and topstitched.
I am intentionally not matching prints.

Next I'll work on the pockets. My brain has a hard time with these, especially when I'm not following a pattern. That means I'm done sewing for tonight.

Did someone say pattern weights? Here's my largest pattern weight:
On another topic. We went to a Brad Paisley concert the other evening, and as usual, I worked myself into a state of anxiety before we even got there.

I get lost so easily; I'm definitely not the person to be responsible for getting us anywhere. Oh, and I always think for a moment, when looking at a map or even in conversation that EAST is on the LEFT and WEST is on the RIGHT. I actually have to correct myself every time. (Can you even imagine how many times in my life I've done this?)

I've always attributed this (ahem) "endearing quality" to my being left-handed—in a right-handed world.

Anyway, I always feel anxious when we go someplace new or that I haven't been to in a while or when we're taking a different route. Add going into a huge parking lot, knowing that it will be dark when it's time to leave. How *ever* will we find our car??? My husband, who drove, doesn't worry about this one single bit. I don't understand!

Sometimes I wonder whether it's because we moved a lot when I was a kid. Or because I don't know where I lived for my first four years. Maybe we're born with an internal GPS and I lost mine somewhere along the way.

I've tried a lot of strategies to lessen my "getting lost" anxiety, but I haven't found one that works for me. I tell myself, "Look, you've gotten this far. Sure, you've gotten *temporarily* lost; who hasn't. You'll be fine. Get a grip!"

We're going to another concert tomorrow evening, but thankfully, it's close by and at a location I know very well. And the parking lot—well, you just have to remember whether you've parked on the grass or the road.

Blessings and peace..

Wednesday, October 9, 2013

Not Just Another Apron, to Me Anyway

When last we talked, I showed you the remaining fabric from the 3.5 yards of "autumn leaves" quilting cotton fabric, which I've been using to make table top items (placemats, table runners), shown here and here.  

My plan was to make an apron. Good news: I did it!


Better news: I also used some darker blue/teal linen, part of it was repurposing some linen pants I made (ahem) some time ago and a little bit of it was from my "resource center" (AKA stash).

I decided on a chef's apron style because that is such an easy style of apron to make. Except that I would be piecing fabrics. And I've been learning that when using quilting cotton, I prefer my aprons to be two layers (yes, I am messy in the kitchen), so I decided to make it reversible. And I prefer the neckband to be one piece (not ties) that is large enough to go over my head—while I have my glasses on—but high enough in front when I'm wearing it, so I decided to insert some elastic in the one-piece neckband. Oh, and I like a pocket and a towel on each apron (so, reversible = 2 pockets and 2 towels). It wasn't so much mathy, like some sewing projects are, but it was definitely a thinking-several-steps-ahead kind of sewing project. I thought, "I'm making it, so I might as well make it just the way I want it." Isn't that one of the reasons we sew?

I was going to create a tutorial but decided against it because, really, who wants to make a chef's reversible apron with a stretchy neckband and a pocket and towel on each side? So I'll just show you a few highlights and lowlights.

Highlights:
I used almost all of the fabric. Here's what's left (and the brown fabric was not part of the original group):

I have an apron that a) fits me, b) I will use a lot, and 3) is reversible so I won't have to launder it every time I wear it (I already shared that I am messy), and d) is pretty.

I figured almost everything out enough ahead of time, so my brain cells were on high activity, part of my brain-maintenance program. Examples: I gathered the towel at the top. I pinned the towel toward the inside so it wouldn't be stitched into the side seams. I stitched both waistbands (one for each side of the apron) on at the same time to minimize the likelihood of some very crooked stitching. I positioned the pockets, which I made to fit the iPhone I will buy one of these days, and the towels for my lefthanded self.

Lowlights:
My corners are inconsistent. I know that this is just an apron, so it's okay for this project. However, I really want to improve my corners. Here's what I do: I stitch, turn the fabric 90 degrees, continue stitching. (Sometimes I stop 1 stitch short of the corner, turn the fabric 45 degrees, take 1 or 2 stitches, turn the fabric 45 degrees, and continue. I see no difference in the resulting corner.) Press the stitched fabric flat. Trim the corner (maybe not close enough?). Press the seams open, if possible. Turn, using a large knitting needle (so, blunt tip) to push out the corner. Sometimes the result is excellent and other times, it's mediocre. I want consistently excellent corners! I welcome your thoughts, links to tutorials/instructions.
See? The 2 top corners are good, the 2 bottom corners are not.

I thought I was finished, so I put it on and asked my personal photographer to take some photos. The camera does not lie. It confirmed a thought that was floating in my mind: the top front sides seem weird (click on the photo to see what I'm referring to):
reverse side of apron
I know how this happened. Because my fabric wasn't wide enough, I thought that this would work:
Um, no, actually, it created sort of flaps. No chef's apron has flaps. If I wanted flaps, I'd have kept them. But I could see how they would get in my way. So I did a bit of trimming and restitching and topstitching.


For the next one, I would reshape the pattern piece for the bodice and also make the bodice a bit shorter. I think I'll go draw a new bodice piece right now, before I forget. Because I will happily make more aprons like this one!

And now, what to do with that last piece of autumn leaves print?
It's only the print fabric I am determined to use up; the others can be incorporated into other projects. Here are my ideas:
  • Make 3 dark blue/teal linen towels trimmed with the print border, similar to others I've made, shown (with a tutorial) here
  • Make 9 coasters, the idea of which makes me wonder whether they'd keep dampness from the table surface, plus I don't have a use for them
  • Make another table mat by cutting the strip into three sections and piecing them so that it might look (remotely) like a 9-patch quilt block
Any other ideas?

Blessings and peace...

Tuesday, September 24, 2013

Progress Report About Those Quilting Fabrics

I am happy to report that I have used the majority of the quilting fabrics that I blogged about here. And I used at least a yard of another quilting fabric as well as a yard of flannel, which I used instead of batting. For tabletop things such as placemats and table runners, I prefer a thinner, flatter finish rather than a puffy, quilt-like finish, so I use flannel fabric instead of batting. Oh, plus I came across a few (?) yards of flannel before I looked for batting.

So far I've made one short table runner and four placemats. Here are a couple of photos:
Four placemats

 
Two placemats and a table runner
And here is how we usually use placemats: on top of a tablecloth. (It's easier to launder placemats than tablecloths, plus as the weather cools, the tablecloth adds a bit of warmth.)
All ready for today
I'm including a few construction details for you and also to help me remember for next time.
Press and then pin the completed placemat top to flannel. Notice that the corner pins are parallel to the edge rather than at a 45 degree angle, which makes the stitching easier. Machine baste about 1/8 in. in from the edge of the placemat top.
Optional: Trim to remove flannel.
Press the pieced top, which has been basted to the flannel, to the backing fabric (brown), which is placed wrong side up. Trim. Then move the backing fabric to on top of the the pieced top and pin, marking (with two pins or a clip) the place to stop stitching, which will create the opening for turning.
From the back, you can see the 1/4 in. stitching all around, except for about 4 in. at the center of the bottom, which is the opening for turning. Clip the corners. Turn. Press. Machine quilt.
One placemat, completed. 
One table runner, completed.

I am planning to make another table runner, narrower so that it can be used with four placemats. And it looks like I will make some coasters. And maybe some trim and pockets for an apron.

I welcome any other ideas. I'm really glad I decided to use this fabric now rather than know that it will be next fall before I am motivated to use it again. It's so autumnal! 

Blessings and peace...

Sunday, September 1, 2013

Invitation to Be Generous: Pillowcases

My Internet sewing friend, Rhonda of Rhonda's Creative Life, has undertaken an enormous project: making 900 pillowcases for... I don't think she'll mind if I copy and paste from her most recent post:

The pillowcases are for the Mary Bridge Children's Hospital in Tacoma, Washington. Each child that is admitted to the hospital is given a special pillowcase. They find that a simple pillowcase helps to lift spirits and brings color into an all to white and scary environment. If you think that you might like to contribute to the project, here is a link to the simplified instructions I did to make the pillowcases. I believe in the motto of "there is strength in numbers," so if you feel that you can do just one pillowcase, it will be greatly appreciated.

Oh how I wish I knew how to indent a paragraph here. Anyway, I have made six so far and plan to make at least a few more. They are one of the easiest-peasiest sewing projects ever, thanks to Rhonda's great tutorial. Here are the first four I made:
My first four pillowcases, details follow, from left to right
Bumble bees and ladybugs
Seashells and triple zigzag stitching at edge of main fabric
Row of pink flowers stitched at edge of main fabric
Serpentine stitch (I think) at edge of main fabric
Inside view of the lower edge/side seam
What do you think? Can you make one (or maybe a few)? Each pillowcase takes only 3/4 yard of the main fabric plus smaller amounts for the accent and trim. Rhonda posted today that she now has 640 pillowcases! Only 240 to go (well, 230 after I send her the six I've completed and a few more).

In addition to the pillowcases she's making, Rhonda hangs the pillowcases she receives in the mail on a clothesline and takes photos for us. Thanks, Rhonda, for inviting us all to be generous. I'm just extending it a bit to any of my readers who haven't been following this lovely journey with you.

Blessings and peace...

Sunday, July 7, 2013

My Version of a Sundress

Inspired by Rhonda, I purchased this fabric from Joann's. Rhonda shortened hers a bit and used some lovely ribbon for straps. I knew that the maxi-length wouldn't work for me; I know I would trip on a long dress, just going up the stairs. LOL Also, I wanted a little more coverage at the top, so I thought I could use the piece cut off from shortening the dress above the border to make a slightly fluttery almost-cap "sleeve." (What's that called?)
After serging the raw edges and preshrinking the fabric in the washing machine and dryer, I cut off the bottom border about 1 in. above the top of the border and set it aside. I then held the fabric up to myself and looked in the mirror, pinning it up, auditioning different lengths until I got it just about right (remembering that I would be reattaching the border). I cut about 12 or 14 in. from the new bottom.


Next, I trimmed the bottom edge, slightly curving the back up so that the center back would be about 1 in. shorter than the front—to allow for (ahem) front body contours, which take up more fabric than my (lack of) back body contours. Please note the level hemline. Thank you.

I reattached the border, using French seams to encase the raw edges, which also added a bit of desired weight to the dress bottom. I then trimmed the serged edges to straighten what would be the center back seam. I sewed this seam, again, using French seams to encase the raw edges

So then I had this nice piece of fabric to make the fluttery almost-cap sleeves. My first attempt was a failure; I don’t even remember what I was thinking. So, with not too much fabric left, I got out my Sure-Fit Designs bodice front and back blueprints. I aligned the front and back shoulder seams and from that, created a pattern piece as long and wide as I could, flaring it out at the center (the part that would go over my shoulder). I serged the outer and inner curved edges, pressed under and stitched to finish them.

Then I tried on the sundress, and by trial and error, pinned the sleeves to the bottom of the top ruffle in the front and back until I was happy with the angle and fit. It took me about 100 tries, okay maybe 50. At least 25. I then trimmed and serged the edges and stitched them, right side of the sleeve to wrong side of the sundress, stretching the elastic of the sundress at the same time. I then hand-stitched the top of the blue ruffle to the sleeves.

Sure-Fit Designs is as handy as a pocket, even when I’m not making an actual garment from it! Using the shoulder area of the blueprint helped me to see what shape I should cut to get the look I wanted.

I know we (seamstresses ~ sewers ~ sewists ~ stitchers ~ sewing artisans) like to see everything up close and personal, inside and out. Here's a closeup of the outside of the top, where the sleeve is attached to the ruffle.

And here it is from the inside. If you look really closely, you can see the stitched I used to tack the ruffle down (thread color deep blue same as ruffle).

Here's how the reattached bottom border looks. I slipped a piece of yellow paper under the seam.
Here's the center back French seam.

I am delighted with the result; I am especially pleased with the neckline. And that I kept at it, even after my first attempt at fluttery sleeves was a total fail? I attribute that to how much I like finishing projects! I wore this dress to a party and then a baseball game yesterday, and I think I will get a lot of use out of it.

Are you still making summer clothes (for this year)? Or, if you're "down under," for your upcoming summer?


Blessings and peace...

Monday, June 17, 2013

An Easy Little Sundress But I Need to Cover My Shoulders

Okay, now for something easy-peasy. Inspired by Rhonda's Creative Life, I want to make a sundress. Goodness, the bodice is already shirred. All it needs is a seam down the back... Wait, I need to cover my shoulders. 

I'll do what Rhonda did and shorten it in a way that I can retain the bottom border. I'm going to make mine somewhere around knee length, so there will be plenty of fabric to work with. I have something like this in mind. (If you have any Photoshop skills, please don't shoot me; this is just an awful combination of a couple of screen captures, I know.)


The fabric is rayon, machine wash, tumble dry and on sale (as of today) at Joann's. (The link takes to you a different print.) I bought mine at the Joann's near my house. 

So I need to make the shoulder "straps" wide enough so that the fabric falls so gently around my shoulders. Rhonda mentioned stretching the bodice when stitching the shoulder straps to achieve gathers. So far, so good. But her straps, which are perfect for her and really very cute, don't cover enough of me for me.

Any ideas? Suggestions? Is this something you've tried? How did it go? I really want to keep this easy. You know how slowly I sew, and I'd like to wear it this season. :)

Does blogger or blogpost or whatever this is have any emoticons? Where are they? I need them! And thank you for any/all ideas.    

Blessings and peace...

Saturday, June 15, 2013

My Pants Are Finished and Angels Are Singing

Because you might not realize the significance of my having just made a pair of pants that fit, I bring you the before. Well, it's not really a before, actually; it's a pair of pants I purchased and have been wearing. They're black stretch denim Not Your Daughter's Jeans. I did a bit of color enhancing because photographing black fabric and having it show anything is next to impossible, for me anyway. So here we have:
I didn't bother to draw lines to bring your attention to anything in particular. Some of the wrinkles are simply from wearing them. Oh, and here we have the same pants, back view:
I believe we could call this one smiles, frowns, wrinkles, and folds. Sigh. This is why I sew. Or should I say why I have been trying to sew a pair of pants that fit me for oh about 20 years.

And here we have my just completed, made from Sure-Fit Designs, pants (fabric is grey tencel):
And the view from the other side:
I do seem to be standing at a bit of a tilt. ??? Smiles: no. Frowns: nope. Wrinkles: not a one. Folds: nada. I believe this is referred to as the Holy Grail of Garment Sewing. 

Here's a close-up of the pockets (I wrote about this process recently, will add a link when I'm not on my way out the door):
Because the pockets don't show in the previous photos.

And me?


P.S. May I please have extra credit / bonus points for not talking about how my weight has changed over the years and how my body is not exactly the particular shape I'd like it to be and when did I shrink I used to be taller and how some of my "soft tissue" seems to have moved from the back of me to the front of me? And how only the inch of hair closest to my scalp is my natural color and not the orange that is the rest of it and at least it's not pink like it was when I colored it a few months ago before I applied Clairol Oops, yes that's a real product? And how we should sew for the body we have and not wait until we have the body we want? Thank you.

Blessings and peace..

Saturday, May 18, 2013

Pondering Pants Pockets

I'm getting ready to make a pair of pants using my Sure-Fit Designs blueprint. I want to add front pockets and have been thinking about the exact angle and curve of the pocket opening I want. So of course I had to read up a bit. Just Pockets: Sewing Techniques and Design Ideas by Patricia Moyes has a lot of information about this, as well as construction information.

I thought I'd take a look at the pockets of my jeans. They're Not Your Daughter's Jeans (NYDJs), and the pocket bag (both layers) goes all the way to the center seam. I'd like to duplicate this and welcome any suggestions and tips, especially if you've made pockets this way.

Here are a couple of photos (please pardon the not-ironed-ness of them):

This photo is of the jeans' pocket area (right side). I'm not going to include the tiny coin pocket. I have drawn in the stitching line of the side front, but you don't see this from the outside of the pants.

The same area but from the inside. I lightened it so you can see the details:
  • Both layers of the pocket bag go to the center (zipper), which is at the left of the photo.
  • The red-thread X is stitched through only the innermost layer (pocket back). I think that this is part of the "tummy tuck" (ahem) feature of these jeans. The stitch itself seems to be a stretch stitch. However, the fabrics of the jeans AND the pockets are 96% cotton, 4% Spandex. So I'm not sure how much stabilizing that X stitching is. It would, though, stabilize the crosswise fabric of a fabric that has no stretch.
I'll be using a woven fabric with no stretch, so I want to give this a try. However, I don't have this fancy kind of stitch, so I wonder if maybe two rows of straight stitching will work. No, I think that any strain in wearing might pop the stitches. What kind of stitch might work? (My machine is a Bernina 1130, if that helps.)

My next pondering relates to the order of construction. Here's my thinking so far. Please chime in.
  1. Cut 2 rectangles of pocket bag fabric the length plus top and bottom seam allowances and width from center to side seams plus seam allowances.
  2. Stitch X (with what stitch?) on the pocket back, ending about 1 in. from bottom. This is the innermost piece of the pocket, which can be seen from the inside of the garment.
  3. Stitch this pocket back to the side front piece, which is cut from the fashion fabric, along curve.
  4. Stitch again, 1/4 in. from first line of curved stitching. Trim away pocket back along curve.
  5. Sew second piece of pocket, which I'm calling the pocket bag front, to pants front, along curve, which is about 2 in. smaller than the curve of the pocket back. Press stitching, then press open, then fold pocket bag to wrong side and press along curve. Topstitch curve, close to the folded and pressed edge, then topstitch again 1/4 in. from edge. (In my NYDJs, it looks like there is a piece of bias on the inside of the curve that covers the seam. ???)
  6. Stitch bottom of pocket pieces, right sides together. Press, press seam open, turn, and press again. Trim and topstitch close to this bottom seam, then stitch again 1/4 in. from first row of stitching. Or stitch a French seam.
  7. Attach at center front and side seams.
If by any chance you have followed my train of thought, do you have any suggestions or warnings? It would be just so loverly to not have to pick out stitches (at best) and/or recut the pants fabric (at second best). 

Or maybe you have a question or two? I'll be happy to clarify anything I can. I'm really looking forward to hearing from you. Thanks!

Blessings and peace...