Showing posts with label Quilting. Show all posts

Wednesday, October 9, 2013

Not Just Another Apron, to Me Anyway

When last we talked, I showed you the remaining fabric from the 3.5 yards of "autumn leaves" quilting cotton fabric, which I've been using to make table top items (placemats, table runners), shown here and here.  

My plan was to make an apron. Good news: I did it!


Better news: I also used some darker blue/teal linen, part of it was repurposing some linen pants I made (ahem) some time ago and a little bit of it was from my "resource center" (AKA stash).

I decided on a chef's apron style because that is such an easy style of apron to make. Except that I would be piecing fabrics. And I've been learning that when using quilting cotton, I prefer my aprons to be two layers (yes, I am messy in the kitchen), so I decided to make it reversible. And I prefer the neckband to be one piece (not ties) that is large enough to go over my head—while I have my glasses on—but high enough in front when I'm wearing it, so I decided to insert some elastic in the one-piece neckband. Oh, and I like a pocket and a towel on each apron (so, reversible = 2 pockets and 2 towels). It wasn't so much mathy, like some sewing projects are, but it was definitely a thinking-several-steps-ahead kind of sewing project. I thought, "I'm making it, so I might as well make it just the way I want it." Isn't that one of the reasons we sew?

I was going to create a tutorial but decided against it because, really, who wants to make a chef's reversible apron with a stretchy neckband and a pocket and towel on each side? So I'll just show you a few highlights and lowlights.

Highlights:
I used almost all of the fabric. Here's what's left (and the brown fabric was not part of the original group):

I have an apron that a) fits me, b) I will use a lot, and 3) is reversible so I won't have to launder it every time I wear it (I already shared that I am messy), and d) is pretty.

I figured almost everything out enough ahead of time, so my brain cells were on high activity, part of my brain-maintenance program. Examples: I gathered the towel at the top. I pinned the towel toward the inside so it wouldn't be stitched into the side seams. I stitched both waistbands (one for each side of the apron) on at the same time to minimize the likelihood of some very crooked stitching. I positioned the pockets, which I made to fit the iPhone I will buy one of these days, and the towels for my lefthanded self.

Lowlights:
My corners are inconsistent. I know that this is just an apron, so it's okay for this project. However, I really want to improve my corners. Here's what I do: I stitch, turn the fabric 90 degrees, continue stitching. (Sometimes I stop 1 stitch short of the corner, turn the fabric 45 degrees, take 1 or 2 stitches, turn the fabric 45 degrees, and continue. I see no difference in the resulting corner.) Press the stitched fabric flat. Trim the corner (maybe not close enough?). Press the seams open, if possible. Turn, using a large knitting needle (so, blunt tip) to push out the corner. Sometimes the result is excellent and other times, it's mediocre. I want consistently excellent corners! I welcome your thoughts, links to tutorials/instructions.
See? The 2 top corners are good, the 2 bottom corners are not.

I thought I was finished, so I put it on and asked my personal photographer to take some photos. The camera does not lie. It confirmed a thought that was floating in my mind: the top front sides seem weird (click on the photo to see what I'm referring to):
reverse side of apron
I know how this happened. Because my fabric wasn't wide enough, I thought that this would work:
Um, no, actually, it created sort of flaps. No chef's apron has flaps. If I wanted flaps, I'd have kept them. But I could see how they would get in my way. So I did a bit of trimming and restitching and topstitching.


For the next one, I would reshape the pattern piece for the bodice and also make the bodice a bit shorter. I think I'll go draw a new bodice piece right now, before I forget. Because I will happily make more aprons like this one!

And now, what to do with that last piece of autumn leaves print?
It's only the print fabric I am determined to use up; the others can be incorporated into other projects. Here are my ideas:
  • Make 3 dark blue/teal linen towels trimmed with the print border, similar to others I've made, shown (with a tutorial) here
  • Make 9 coasters, the idea of which makes me wonder whether they'd keep dampness from the table surface, plus I don't have a use for them
  • Make another table mat by cutting the strip into three sections and piecing them so that it might look (remotely) like a 9-patch quilt block
Any other ideas?

Blessings and peace...

Tuesday, September 24, 2013

Progress Report About Those Quilting Fabrics

I am happy to report that I have used the majority of the quilting fabrics that I blogged about here. And I used at least a yard of another quilting fabric as well as a yard of flannel, which I used instead of batting. For tabletop things such as placemats and table runners, I prefer a thinner, flatter finish rather than a puffy, quilt-like finish, so I use flannel fabric instead of batting. Oh, plus I came across a few (?) yards of flannel before I looked for batting.

So far I've made one short table runner and four placemats. Here are a couple of photos:
Four placemats

 
Two placemats and a table runner
And here is how we usually use placemats: on top of a tablecloth. (It's easier to launder placemats than tablecloths, plus as the weather cools, the tablecloth adds a bit of warmth.)
All ready for today
I'm including a few construction details for you and also to help me remember for next time.
Press and then pin the completed placemat top to flannel. Notice that the corner pins are parallel to the edge rather than at a 45 degree angle, which makes the stitching easier. Machine baste about 1/8 in. in from the edge of the placemat top.
Optional: Trim to remove flannel.
Press the pieced top, which has been basted to the flannel, to the backing fabric (brown), which is placed wrong side up. Trim. Then move the backing fabric to on top of the the pieced top and pin, marking (with two pins or a clip) the place to stop stitching, which will create the opening for turning.
From the back, you can see the 1/4 in. stitching all around, except for about 4 in. at the center of the bottom, which is the opening for turning. Clip the corners. Turn. Press. Machine quilt.
One placemat, completed. 
One table runner, completed.

I am planning to make another table runner, narrower so that it can be used with four placemats. And it looks like I will make some coasters. And maybe some trim and pockets for an apron.

I welcome any other ideas. I'm really glad I decided to use this fabric now rather than know that it will be next fall before I am motivated to use it again. It's so autumnal! 

Blessings and peace...

Friday, September 20, 2013

Must Use These Quilting Fabrics

In organizing my fabrics—something I've been wanting to do for a few months years—I came across these coordinated cotton fabrics that I bought at a very nice little quilt shop. 
1/2 yard panel
1 yard striped print (a little more than half is shown)
Top left: panel. Bottom left: striped print. Right: 1 yard each gold and green "mottled" solid.

I am not a quilter, but once in a while I go to a quilt shop with a friend who is a quilter. Of course I want these independent shops to stay in business, and I did like the look of these fabrics, but here we are at least a year later, and I still haven't done anything with them. If I don't sew them up now, it will be at least another year before I look at them again—because of the seasonal nature of the prints.

I found a free project sheet at Fabric Depot; here's the cover:
Project sheet
As you can see from the project sheet, I don't have all the fabrics in the collection (whew!).  The project sheet is 9 pages and includes instructions for making everything you see here.

I plan to make a reversible table runner and a small (approximately 12-in. square) table topper. But I don't need any more placemats. 

Do you have any ideas or suggestions or links to easy—remember easy, please—for using up this fabric? I'd like to make some gifts that people would really like and use. Maybe a set of coasters from the smaller print? Maybe an easy apron? Any other ideas?

Bonus points / extra credit for any ideas that use these fabrics in something I could wear without looking like I'm wearing a quilt.

I'm making myself use this fabric to burn it into my brain to stop buying fabrics for quilting projects! Maybe it's not my responsibility to keep quilt shops in business.

Thanks for any and all suggestions. I will post updates. Achi dachi!

Blessings and peace...

Wednesday, September 4, 2013

Giveaway Result and More Zippered Cases

Good morning! Here's the result of using random.org, which generates random numbers from the range you submit, for my little zippered case giveaway contest. 
My plan was that if I selected a number that represented Theresa, who requested to not be entered, or me, who replies to lots of comments, that I would repeat the process. However, that wasn't necessary. Congratulations to Martha, who said, "...storage of our younger granddaughters hair ornaments - pony tail holders, baretts and such!" Please contact me, Martha, and let me know which of the three little zippered cases you'd like.

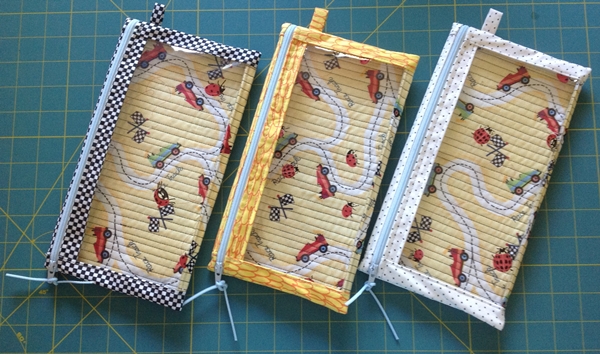
I made three more from the road and cars fabric. I plan to make two or three more, from different fabric, then I'm going to move on to other projects.

Because the zipper pulls are small, I thread a strand of the cut-off part of the zipper through the tiny hole in the zipper pull, then tie it. Here's a close up of one:
Blessings and peace...

Saturday, August 31, 2013

Pattern Mini-Review and a Giveaway

 This is the fifth one of these I've just made:
I saw this pattern a few times, and I had to have it. 
(The clickable link takes you to a page where you can order it. Because I don't know how to make a clickable link from an image. Anyone? Anyone?) It's possible that some of you could figure it out by looking at the pictures, but not me. I need instructions, and the more detailed, the better. And lots of close-up photos. So I ordered the pattern (the first time I've purchased a downloadable pattern) for this little zippered pouch made out of quilted fabric that has a clear vinyl front. The photos are so clear and helpful. And the instructions are quite good. I'm glad I purchased the pattern. Tracy, the designer, includes a lot of tips for sewing vinyl. I followed the instructions to a T. And I made one. Then another, and another. Then I got the idea of changing the size. My first attempt came out a little odd, but maybe in an endearing way.
See how the vinyl "wraps around" the bottom? That's what I mean. Endearing?

Then I wondered what would be the biggest size I could make with a fat quarter*. The photo at the top is one I made last night, and it's close.

And these were all made with one fabric each. Imagine how cute they'd be made up with multiple prints. Which I will get to. These are so much fun to make, and a pleasant break from garment sewing.

Okay, so let's have a giveaway. Would you like to win one of these? 
Post a comment by Tuesday, September 3 at 11:59 pm EDT. Try to give me some ideas about the size(s) that would be most useful to you and/or what you would use it/them for. I'll announce a winner (anywhere! Not limited to the United States!) by Thursday, September 5.

I've been using fabrics and zippers and vinyl that I have on hand. The vinyl has ladybugs in a random pattern all over it. I have no memory of what I thought I would make with it when I bought it (ahem) some time ago. And I'm not sure how much of it I have left. But now I'm going to use it all up on these. Unless you have some other ideas for easy sewing projects that use vinyl (with ladybugs sprinkled randomly all over it).

* A fat quarter is a term used in quilting. It means 1/4 yd of fabric, but instead of it being the full width of the fabric (usually 42 to 44 in. wide) and 9 in. long (1/4 of 36 in. [36 in. = 1 yd]), it's 1/2 the width and 1/2 the length. So a fat quarter is still 1/4 yd, but it's about 22 in. wide by 18 in. long.

Update: This next one (just completed) is off the top of the cuteness scale (in my opinion). Wouldn't it make a great case for a summertime first aid kit? The size, as you can probably tell, is about 9 in. wide by 5.5 in. high. I added a little loop to this one, too, so that a key ring (for example) can be added.
Front
Back
I made it from fabric left over from this purse project:

Blessings and peace...