It's all
Ruthie's fault. She put the Christmas hearts idea in my mind. Then, I knew I wanted to make this...
...as soon as I saw this pewter charm at
Sew Thankful last week.
 |
| It's about 3/4 in. across. |
I bought six gold tone and six silver tone charms. They are sold out now, but if you do a search for nativity scene charm, you'll get plenty of results at a wide price range. Or you could use any other charm – or no charm at all – to make these sweet ornaments.
For the charm ornaments, I gathered my supplies, clockwise from the top:
Plaid flannel fabric left over from table linens made for a baby shower this summer
Red felted wool left over from dining room chair pads I made a few years ago
Green/red/gold ribbon
A heart-shaped cookie cutter
(Not shown: small pieces of white/pastel cotton flannel plus the usual sewing supplies)
I made a paper pattern from the cookie cutter for the heart shape. I used a plastic lid for the ornament shape to which I added a rectangle shape at the top and a slightly smaller plastic lid for the white flannel.
For Each Ornament
Cut out one heart shape from the red wool, two ornament shapes from the plaid flannel, and two circles from the white flannel. Cut 1 piece of ribbon 6 in. long.
Hand sew the charm to the felt heart.
I was having a bit of trouble tying the knot on the back because everything was so small and light. Until I set a pattern weight on the plaid flannel to hold it in place while I tied the knot.
Place the heart onto one plaid flannel ornament so that the charm is aligned with the little rectangle at the top. Using any decorative stitch, stitch the heart to the plaid flannel. I used two threads together in the top so that the stitches would stand out, and I used stitch #26 on my Bernina 1130, increasing the stitch length to 3 and setting it to mirror image. (Please pardon my too-detailed information here. I might want to make these again some day!)
Place two layers of smaller white flannel in the center of the second plaid flannel ornament shape and stitch around.
Place the "charmed" heart embellished plaid flannel onto the plaid flannel that has the white flannel circles so that the white circles are on the inside.
Fold the ribbon in half and insert it between the layers of plaid flannel, at the top little rectangle. Stitch all the way around all the layers as close to the edge as is easy.
I used all of the charms – some to keep and some to share.
Cat Toys
I exchange a small Christmas gift with my friend Mariquita every year and always include something handmade for her kitties. She has two young Ragdoll kitties that I will see for the first time when I visit next year. I'll be sending Mariquita one of the nativity scene ornaments and these for the kitties:
I gathered my supplies:
Two 4-in. square pieces of blue felt left over from a jacket I made some time ago
Red felted wool small scraps left over from the nativity scene charm ornaments
Two squares of TP
Small amount of catnip
Usual sewing supplies
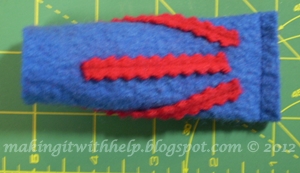
First, use your zigzag (or plain) rotary cutter (or scissors) and cut a few thin strips from the red wool. Straight stitch them onto the blue felted wool in no particular pattern but keeping them 1/2 in. away from the edges.
Fold the embellished square in half, with the embellishment on the inside.
Stitch a 1/4 in. seam along the long open side.
Press open.
Turn right side out. Sew across one end.
Place a small amount of catnip on a square of TP.
Fold to enclose the catnip.
Slip the little packet of catnip into the opening. Turn the blue "tube" 1/4 turn, then insert the end of a ribbon and stitch across. That looks kind of like a mouse, doesn't it? If you squint your eyes almost closed and then turn off the lights? I happen to know a few other kitties that might like these.
I hope you enjoy reading about my (sometimes very little) sewing projects, and that they will inspire you to make something easy, simple, fast – if you feel like it, that is.
Blessings and peace...